找回密码
 注册

QQ登录

快捷登录

新浪微博登陆

搜索
CDD 法语助手
楼主: sinomec

没有底片扫描仪怎么扫底片 不知有人发过没

36
回复
21051
查看
[ 复制链接 ]

新浪微博达人勋

國外-自制 閃光燈 配件教學 及 效果(資料很多)
分享一下網上找到的資料 -

有空的朋友連到下面網站去看看吧!

http://digital-photography-school.com/diy-flash-and-lighting-hacks-for-digital-photographers

自制閃光燈配件

以下為其中一種、效果

Beauty Dish for the Mechanically challenged a guest post by Just Fab
I had the honor of being photographed by one of my mentors, Don Giannatti (Wizwow on flickr) the other day after attending one of his fantastic lighting seminars. He chose to use a beauty dish on me. I love the way beauty dishes look, especially the way it sculpts the edges of my roundish face. Soft concentrated light which falls off quickly. You can learn more about the merits of the beauty dish on Don’s site.
Most of my inspiration for lighting setups come from that site and DVD. Anyway, I was so excited when I saw the images I knew I had to come up with something that could recreate the look that was portable and wouldn’t break the bank. Although I am handy with PVC pipes, my ability to use power tools are in question. I was thinking of cutting out a hole in a wok or mixing bowl, but I still couldn’t figure out how to rig it to reflect the concentrated beam back into the dish, plus my lighting stand would probably never stay upright with that kind of weight.
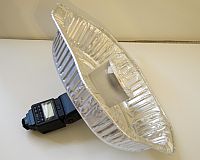
Then in a moment of brilliance, if I may say so myself, I came up with the lighting mod you can see at the top of this post.
I used a “Fong” type Lambency diffuser that I carry with me in my bag, but you can make a DIY one as listed on here.

I took the blue “cooling filter” lid that I never use and covered it with foil to reflect the light back. Next I took an inexpensive ($2.99 US) aluminum turkey-roasting pan and cut a hole in the middle to accommodate the base.
Next place the foil covered lid on. You may need a little duct tape to keep things secured. Attach to the strobe and you are in business! And if you travel by air just take the diffuser with you, go to the grocery store pick up the pan and some foil. No need to lug your equipment, although you may get some odd looks if you are trying to appear professional.
Here is the original image taken with an approx $200 dish:
Here is my $2.99 dish. I think mine makes me look, well…at least 25 years younger!

A little bit of Just Fab by Just Fab
Here is the beauty dish in action. Hope you enjoy!


2009-7-21 10:16:39

使用道具 举报

新浪微博达人勋

自己动手丰衣足食阿,大大地学习了~
2009-7-21 10:21:10

使用道具 举报

新浪微博达人勋

本帖最后由 sinomec 于 2009-7-21 11:37 编辑

再发一个翻拍设备,效果好的。作者liangdian-9287,来自“蜂鸟网”。

本人有很多早年拍的135、120底片,花钱去扫太贵,买一台又不值得。看扫描仪工作原理受到启发,为啥不利用自己的相机翻拍呢!说干就干:
1、材料
a.硬纸板1-2mm 厚,约A4纸大小1张。(其他硬度合适不透光的材质也可)。b.根据自己相机镜头外直径大小的圆形纸筒。极好找!薯条包装筒等。当然其他不透光材质也可。(可以根据自己相机镜头的对焦点决定纸筒长短,最好是用带有近摄功能的镜头,这样可以有效缩短镜筒长度,提高对焦精度。
2、工具
铅笔。直尺。胶水。裁纸刀。作废胶卷。
3、制作135胶片翻拍架
a.首先根据镜头外直径,将硬纸板裁出比镜头直径四边各宽出2-3cm的正方形纸版2块。根据正方形纸版中心预留135胶片高度尺寸,再裁出正方形纸版上下剩余尺寸的纸板各1块。(拼合后应与正方形纸版对齐) 01.jpg
b. 将正方形纸版2块四边对齐,在中心处,将一片135胶片的影像尺寸,用裁纸刀裁掉。 02.jpg
c.在正方形纸版中心预留出135胶片高度尺寸后,将剩余尺寸的2块纸板与2块正方形纸版外框对齐后,用胶水均匀粘合。粘合后,用一些书本在平整的桌面压住,时间2小时以上。为了插入胶片方便,可在插口处和中心出口处各裁出5mm缺口。翻拍架完工。 03.jpg
d.我用的镜筒是薯片包装筒。内直径约66mm。先按镜头对焦点长度,将包装筒裁成2段。一段约90mm长作镜筒,可将镜筒与镜头直接连接。另一段15mm长,裁完后剪断,按镜筒内径长度剪掉多余部分,再粘合上。然后粘合在翻拍架的中心位置上作翻拍架与镜筒的接环。(我翻拍用的镜头:尼康28--85mm带近摄镜头,外直径65mm ,对焦点长度约85mm。)完工!!! 04.jpg
e.120底片的参照此作法。
4、将要翻拍的底片插入翻拍架,将翻拍架的接环与镜筒连接,在将镜筒与镜头连接,对着有阳光的白墙就可以进行翻拍了! 05.jpg
5、此“扫描仪”有几大特点:1、一分钱不化,2、材料唾手可得,坏了可再作;3、制作简易方便;4、操作轻便,底片随着机身动,没有晃动,只要对焦准确,张张成功;5、翻拍质量完全可以接受!6、翻拍后,可在Adobe Photoshop软件上作反相,并通过其他技法得到不错的翻拍片! 06.jpg
在此特向广大摄友自荐,尤其是爱好胶片摄影的摄友无疑可以省下很多时间和金钱!有心灵手巧的朋友还可以在此基础上进一步完善。比如镜筒内可以涂上黑色,在接环处可以改进,胶片架可以用黑薄朔料板,其他带微距功能的小型相机亦可以尝试等。 07.jpg 08.jpg
附:我制作的样品, 翻拍的底片小样, Adobe Photoshop反相后的照片。 09.jpg 10.jpg
2009-7-21 10:34:41

使用道具 举报

新浪微博达人勋

本帖最后由 小杰 于 2009-7-21 11:41 编辑
我来设好了。。。
coolbank 发表于 2009-7-21 10:57

分区总版确实不一样啊,呵呵,不过老这样不是个办法吧,能不能换个功能健全点的来当版主
2009-7-21 10:40:00

使用道具 举报

新浪微博达人勋

个人觉得翻拍只是一个应急措施,画质不如底扫。
而且由于ccd的物理缺陷,翻拍的片不能传承胶片的高宽容度,但是如果能手动翻拍,
用不同的光圈指数,对亮部、暗部细节分别曝光,
然后再用PS叠起来合成,可能效果要好 ...
sinomec 发表于 2009-7-21 10:10

这个太复杂了,仅那个翻拍的盒子看起来就已经很强大了,呵呵

前阵子在屋脊上有个人用g10翻拍底片,效果不是很好
2009-7-21 10:45:35

使用道具 举报

新浪微博达人勋

为庆祝加精,再转发一个DIY集锦。
自己动手丰衣足食 玩家自制摄影器材DIY早已成为许多人热衷的活动,打造完全属于自己的家私、电子产品或者交通工具,已经成为一种风尚。DIY可以最大程度贴合自己的需要,也能省下不 ...
sinomec 发表于 2009-7-21 11:15

图片down掉了
2009-7-21 10:46:11

使用道具 举报

新浪微博达人勋

國外-自制 閃光燈 配件教學 及 效果(資料很多)
分享一下網上找到的資料 -

有空的朋友連到下面網站去看看吧!

http://digital-photography-school.com/diy-flash-and-lighting-hacks-for-digital-photographers

自 ...
sinomec 发表于 2009-7-21 11:16

楼主存货很多呀,不知道有flickr没有,不拉进我们flickr群组很是损失呀
2009-7-21 10:47:30

使用道具 举报

新浪微博达人勋

图片被网站禁止外链了,刚刚全部下载本地化了。
谢谢提醒。
图片down掉了
小杰 发表于 2009-7-21 11:46
2009-7-21 11:07:55

使用道具 举报

新浪微博达人勋

好的,等我去参观下。
楼主存货很多呀,不知道有flickr没有,不拉进我们flickr群组很是损失呀
小杰 发表于 2009-7-21 11:47
2009-7-21 11:09:33

使用道具 举报

新浪微博达人勋

这个应该是DIY精神的发挥
用普通扫描加反射版自己扫也想过, 不过还没有看到很好的样片,效果实在一般
我觉得翻拍那个倒是值得玩一下, 通常民用扫描仪器速度太慢了...........
2009-7-21 11:38:04

使用道具 举报

新浪微博达人勋

呵呵不错支持下!

曾经还想过把扫描仪接在8*10的后背上~~
2009-7-21 12:01:13

使用道具 举报

新浪微博达人勋

....还是买个底扫把
2009-7-21 22:07:11

使用道具 举报

新浪微博达人勋

呵呵不错支持下!

曾经还想过把扫描仪接在8*10的后背上~~
tintin在法国 发表于 2009-7-21 13:01

这个想法很特别阿
2009-7-21 23:12:42

使用道具 举报

新浪微博达人勋

DIY 都是缺钱搞得
2009-7-22 19:21:47

使用道具 举报

新浪微博达人勋

本帖最后由 一岁一枯荣 于 2010-7-6 22:28 编辑

这个帖子不介意我顶起来吧


我等下就去买薯片去~~~
2010-7-6 20:57:33

使用道具 举报

您需要登录后才可以回帖 登录 | 注册 新浪微博登陆

本版积分规则

返回顶部